Build sequence of the oven I built with Christin at the Eco-Justice Center. We did most of our sessions together, and we each have at least 40 hours in this project. It's a substantial undertaking, and we worked very fast and hard. A more leisurely pace, or working without experience (this was my 5th oven) would make this project go significantly slower. Material expenses came in around $1200, but I don't think this included the concrete slab that the concrete blocks are sitting on.
November 3. Our last big session of work together, spent applying stucco to the cladding. We used the cement mixer and used up 1 80 lb bag of stucco, using a mortar color to get the nice tan color. The stucco took a lot of pressure to stick, but overall it went on nicely and the color is actually quite stunning to see in person. The chimney height is a wild guess but it looks about right.


October 29. Christin did some chimney work the day before and we did a small amount of planning on this day. Too cold so we quit early.

Concrete cladding going on October 27. We used a total of 14 60 lb bags of premix. I used an air-entraining admixture to improve the workability of the concrete.

We used our hands, trowels, wood blocks, and a large random orbital sander to get the concrete to settle.

Cladding took around three hours, all hard work. We pulled the forms off about 5 hours later and worked the concrete around the lip where the wall met the dome. There was a little damage to the cladding when the form pulled away some small chunks down low on the sides. We plan to fill this in with some stucco/mortar.

The dome covered with 3-5 layers of heavy duty aluminum foil, which reflects heat and helps to decouple the cladding from the brickwork. Reinforcing wire is some ordinary fencing material.

The arched oven opening came out nice.

Christin jumped inside to tuckpoint some gaps in the brickwork.


Back corners were formed with just 4 bricks. Cutting these bricks takes a long time on the 10" wet saw, which cannot cut all the way through a brick laid on edge. So a double taper cut takes 4 passes of the saw.

By keeping the corners at the front and the back tight, the closing in process is greatly simplified. In the back we just laid two courses in a staircase, then closed things up with bricks and 45 degree cuts. This kind of cut is easy on the wet saw.

October 16--all three arches are up, and most of the outline is in place. We did arches 2 & 3 in the same session, and I pulled the form out just a little too soon. The #2 arch slumped ever so slightly at the peak.

Arch work pics that Kate took, probably October 16 or so.


Closing up the front. You need to set the front opening first, and then fit the sides of the oven to that opening. This oven has 3 brick arches, which I think is probably a very good depth for most applications. We would have liked to make this oven wider but this was the widest we could go on the slab that was provided.

October 14. I put up the first arch. After this point Christin laid most of the bricks while I spent most of my time cutting bricks and planning the next move.

October 12. Pouring the floating slab. This is the critical innovation in an Alan Scott oven. The oven slab is suspended and decoupled from any mass that could draw heat out of the oven's mass, just being suspended on 5/8" re-bar. The bottom of the slab is a vermiculite/cement mixture to add even more insulation. Above the re-bar it is ordinary bagged concrete. The slab came out good and flat, and pretty well tamped.

The front (over to the right) is open and 2 pieces of angle iron hold up the blocks.

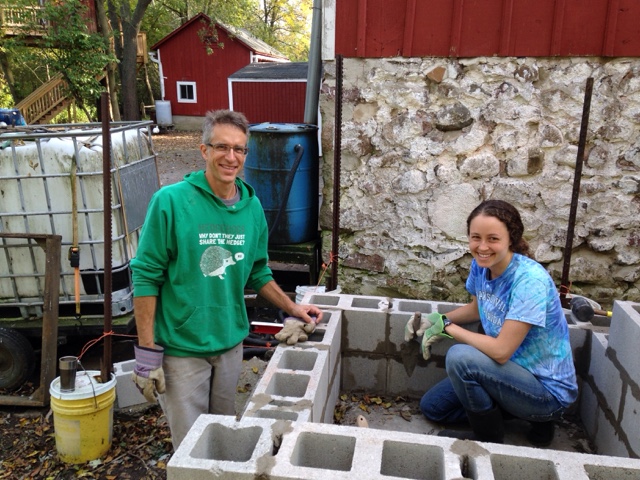
First day of work was October 5. The concrete slab we started with was uneven and we did some correcting with the mortar joints to try and get things leveled up.

No comments:
Post a Comment