Saturday, February 6, 2016

Model 600

I have been anxious to build a larger mill ever since the first one got going.  After finding an acceptable source for stones in Denmark, I wired out the money and did not have long to wait.  It turned out that air freight was the cheapest so in a week or so the millstones were waiting for me in a bonded warehouse.  I made purchase terms CPT (cost paid to) Mitchell Field, again to save money, and I also did the customs clearance myself.  It was pretty easy.  The hardest part was the stones themselves--shipping weight was 360 lbs!  I rolled the fixed stone into the house, this one is a little larger than the runner stone and I think it weighs around 200 lbs.  The working area is 600 mm in diameter, and overall it is a bit bigger (27" across the top).


Here is the frame going together.  I used 4 x 4 Douglas Fir legs, 2 x 8 stringers, and some high-quality plywood for the top.  The bridge tree is a solid piece of white oak, and the jack is 3/8" rod that I threaded to 16 tph.  The construction is a little weird since I want to be able to disassemble it next year and get it up the stairs, which are quite narrow.


Here you can see the thrust bearing and the adjustable housing I made for it.  The runner stone is basically sitting on this bearing, and the bridge tree can raise and lower the spindle shaft.  The bearing housing is adjustable so that I can "tram the spindle," ie, align the runner stone to the fixed stone.  The lower bearing is an ordinary farm bearing.  I could not find the thrust specs for it so I will just wait to see how it does.  The shaft is 1 1/2".  The 9.6:1 gearbox is a lucky find from craigslist, otherwise I was looking at a double reduction drive to get the speed I want.  This will drive the mill at around 160 rpm I think.


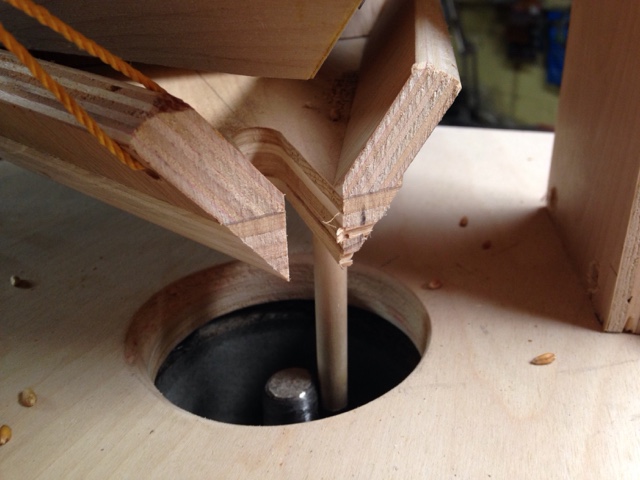
Here is the spindle coming through the mill table.  The tapered bushing was custom made for me at a local machine shop.  I welded up the other bushing to fit into a keyway in the runner stone and drive the stone. 


The spindle has two flats on it so it can tap on the damsel while running and keep the grain flowing smoothly.


Another shot of the lower thrust bearing.  Bearing and pillow block came from fleet farm, and I had to trim the corners of the pillow block to fit my adjustable housing.


Lowering the runner stone into place for the first time.


The runner stone wobbled on the tapered bushing, which was a surprise.  It thought it would lock on perfectly.  I ended up slotting the bushing so that the taper would lock it onto the shaft better, and I made this additional bushing to drive the millstone into the tapered bushing.  I also had to pick the stone up a couple of times and put some brass shim stock on the side of the taper in order to get the stone square to the spindle shaft.  The black bushing is a weld-type bushing that comes from Farm and Fleet.


Lowering the fixed stone into place.  These type of millstones are designed to have the lower stone moving, not the upper stone.  Having tried it both ways on the mini-mill, I really like the lower stone being the runner stone.  The eye never clogs up and a single grain kernel feeds instantly into the stones for grinding.


The upper stone needs to be suspended on something so I settled on making the housing out of staves.  I had to cut up at least 40 to get all the way around, using up a lot of nice wood in the workshop.


It was kind of exciting getting this thing glued up in a timely fashion.  The masking tape works wonders for gluing up staves.  Tape the outside, flip it so the inside seems open up, then brush the glue into the joints.  When the staves are put in place the tape does an amazing job of clamping everything together.  Cross fingers it cures up and makes a strong housing!


Wednesday, January 6, 2016

Up and Running!

The micro-mill model #1 is up and running now.  The basic specs are 250 mm Engstrom millstones, 3/4 hp electric motor reduced about 8:1, and a 12" diameter bolting reel with 640 micron stainless steel cloth.  Here is a decent video showing it under operation:


As-built the bolting cabinet is pretty much a requirement for making good flour.  Although the stones can be set to make very fine flour, for some reason a few poorly ground berries do get past the stones.  I worked very hard to get the stones flat but I think they are still flawed.  I'm disappointed that the factory did not provide me with well dressed stones to start out with.  I did learn from the quality person at Engstrom that small stones do not make the very best flour, but I think the lack of flatness is contributing to this problem.  Anyhow, this means that right now if I want to make 100% extraction flour I have to re-grind the bran to get enough bran into the flour.  If I ran the mill without the bolter there would be a tiny amount of unground berries in the flour.  I may try to set up the bolter with even courser cloth, so more bran will fall through, but I think the long term fix is larger stones.  I am trying to source 600 mm stones now.

Monday, December 28, 2015

Bolting Reel

I built a bolting (sifting) reel for the micro-mill, using old time mills like the one in Richfield as a pattern.  Although old sources recommend bolting reels that are 12, 16, or 20' long, I am hoping that I can get away with a much shorter reel since I do not sift very finely.  This reel is 12" in diameter and 24" long.  The mesh is 32 mesh T316 stainless steel bolting cloth, which has openings of 629 microns.

Here is the reel, 6 sided and built on a 1 1/8" dowel.


Here is the cabinet going together.  Angles are all 45 degrees, which works OK but I later found the flour can still hang up on the sides.


My Dad gave me a worm drive gearbox which had a 60:1 reduction.  This works great although the cabinet is resonating and the 1/4 hp motor is making a lot of noise.  The reel is turning about 45 rpm I'd say.  The bearings are all hardwood, lubricated with beeswax at this point.  I made the pulley on a lathe, quick and dirty.


Here is the bolting cabinet being tested with the mill.  Flour comes out of the mill and gets dumped inside the reel while it turns.  Flour comes out the small hole and bran the larger hole at left.  The extraction level is 90%, based on the first full bag I milled.  I am going to experiment with re-grinding the bran and increasing the extraction level.  This mill spits out cracked grains and it really needs to have the bolting attachment at this point. 


This 90% flour is really making a nice loaf.  Here is my second attempt, which was the lightest and chewiest loaf I have made so far:


Sunday, December 13, 2015

Millstone dressing

To improve upon my mill project I ordered a set of 250 mm composite millstones from the Danish company Engsko.  Unfortunately, the millstones would not produce good flour in the mill.  I made several attempts to carefully line up the stones, shimming the mounting of both the bed stone and the runner stone, and finally "tramming the spindle."  No matter what I did, the mill would not produce good flour.

So I eventually concluded that the millstones as delivered were not properly dressed.  My own hunch is that these stones warped at some point in the curing or aging process.  The 250 mm stones are very small and I suspect this company does not sell that many of them.  Anyway, I pulled the runner stone off the shaft, which was a giant pain since my homemade keyway had welded the fitting onto the shaft.  I really had to pull hard on the harbor freight bearing puller, but remarkably it worked and I got the stone slid off.  Here is what I found with the straightedge:


Both the runner stone and the bedstone are high in the middle.  


This is a combination of old school and new.  I painted soot and linseed oil onto a stick of wood that I jointed to be perfectly straight.  By dragging it across the stones you can see the high spots.  In the above pictures, before I started, you can see how little of the stone was actually available to grind flour.  They are almost 1 mm high in the middle!


Here is how it was looking after a few grindings.  Not nearly flat enough, as it turned out.  But it sure seemed pretty flat to me at the time.


I eventually converted the mill to run with the lower stone as the runner stone, which I discovered is the modern way of building a horizontal mill.  The eye stays cleaner and it seems to draw grain in more evenly.  Anyway, the mill ran a little bit better but it was clear that more aligning was in order.  Here I am using a dial indicator to align the runner stone to the shaft.  I got it even to within a couple thousands of an inch. 


But it still wasn't good enough.  I began to suspect that the landings were getting too glazed from the angle grinder, so I went at it with a pick to roughen up the lands.  A brick hammer is working pretty well, as long as I sharpen it regularly.


It's getting closer to making flour, as you can see the white powder in the below picture.  But it has to be better, so now I am painting the stones with food coloring, running them together, and then hammering away at the places where the stones touch.  I'm learning a lot about millstone dressing!  Will report back when it's finally working well...


Sunday, November 29, 2015

Grain dryer

I purchased 6 bushels of compromised red fife spring wheat that I hope will be viable for a planting in 2016.  The wheat measured 19% humidity when I bought it last Sunday.  Ouch!  The smell was obvious without any need of testing, and I was pretty amazed that it was not actively sprouting or getting black inside.

Anyway, I needed to build a dryer ASAP.  Turns out 55 gallons is almost exactly 6 bushes, so I grabbed this barrel and cut off the top.  On the bottom I built a wooden box with a small blower.  On top of the wooden box I cut 3" holes and stapled window screen over the openings.


So here you can see the setup.  After a couple of days I added the ceramic heater, so the blower draws in some hot air.  You can really feel the air moving through the grain and coming out the top.  For the first couple of days, the moisture level hardly moved.  But 2 full days of heat really got it going, and today it is testing in the 13's.  The volume has gone down noticeably--the pile of grain is about 3" lower now!  I will give it another day or two before bagging and storing, and doing a good germination test on the lot.


I'm really glad I took the time to build a gate to draw grain off the bottom.  I have been draining a couple of buckets each day and pouring it back on top, to agitate and move the grain around.  It should make bagging very easy, too.


Sunday, November 22, 2015

Mill Project

Here is my "mini-mill" project, which I am building as precursor to a more ambitious unit.  I have been studying historical sources and examining modern horizontal mills to get guidance and inspiration.


The shoe and damsel meters out the flow of grain into the eye of the runner stone.  It was fun to build this part and it works great.


Here you can see the runner stone and the octagonal housing I built.  I glued a little flag onto the outside of the runner stone to help create some wind to push the flour out.  You can also see that I ground the top of the spindle to create an eccentric that the damsel rides against.  This jostles the shoe and helps the grain flow out evenly.


The pattern is a classic layout of lands and furrows.  Grain enters from the top and moves out as it is reduced into flour or feed.


Here is an early fit up, trying to figure out how the housing is going to work.  The bed stone is bolted down to the base, and the spindle is supported on a bearing mounted on the bridge tree below.  The crane, screw, and bale (at right) can then be rotated to raise and lower the spindle.


This is the bedstone after removing from the form, with the top bearing I used. This top bearing seems to bind on the spindle and prevent it from moving up and down smoothly.  I am going to try a hardwood top bearing next.  Hardwood top bearings have been used in stone mills for centuries.


I cut the form to make the furrows and lands as a three-dimensional mirror image using a dado head on a radial arm saw, then dropped it into the bottom of a 12" diameter bucket and put in counter top mix cement.


Monday, November 16, 2015

November Survey

Garden status as of November 16.  There has really only been 2-3 nights of frost to date, not enough to kill the swiss chard or bok choi.  There is a bunch of stuff that I just did not get to.  The below pick shows the historical grains research plot, all healthy and strong.  To the right I have mulched some of the leeks and carrots to stretch them out.  The light green are daikkon radishes, which I planted too late to be of much use.


The oats and peas which were drilled over the spring wheat and garlic took well.  Weirdly, the South end is peppered with volunteer bok choi, really nice stuff that I have gotten many good meals out of.  Much better than the bok choi that I intentionally grew this season.


Three rows of garlic, trying a mulch for the first time.  I have so much wheat straw that I am just coming up with things to do with it all.


Red clover from the barley and winter wheat strips, and to the right is wheat and a little vetch which is a cover crop in the former corn ground.